MembraneBreathCtrl: Unterschied zwischen den Versionen
Tut (Diskussion | Beiträge) |
Tut (Diskussion | Beiträge) |
||
| (9 dazwischenliegende Versionen desselben Benutzers werden nicht angezeigt) | |||
| Zeile 1: | Zeile 1: | ||
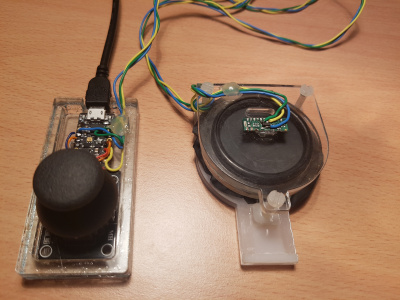
| − | [[Datei:MembraneBreathCtrlComplete.jpg| | + | [[Datei:MembraneBreathCtrlComplete.jpg|400px|thumb]] |
== Features == | == Features == | ||
| − | * Breath controller | + | * USB-Midi Breath controller |
** Send control change messages via Midi to DAW (CC2 breath control) | ** Send control change messages via Midi to DAW (CC2 breath control) | ||
** Fast and responsive (200 Hz CC2 update rate) | ** Fast and responsive (200 Hz CC2 update rate) | ||
** Easy to clean and easy to dry - pressure sensor can be opened via a slide | ** Easy to clean and easy to dry - pressure sensor can be opened via a slide | ||
** Based on a linear Hall-sensor and two magnets on a membrane cut out of a rubber glove | ** Based on a linear Hall-sensor and two magnets on a membrane cut out of a rubber glove | ||
| − | * X/Y Joystick | + | * USB-Midi X/Y Joystick |
** Sends 4 additional CCs | ** Sends 4 additional CCs | ||
| − | * Optical metronome | + | * USB-Midi Optical metronome |
** Uses internal RGB LED | ** Uses internal RGB LED | ||
** Indicates Beat 1, 2, 3, 4 of optically (no annoying click-sound) | ** Indicates Beat 1, 2, 3, 4 of optically (no annoying click-sound) | ||
| Zeile 23: | Zeile 23: | ||
=== Cleaning === | === Cleaning === | ||
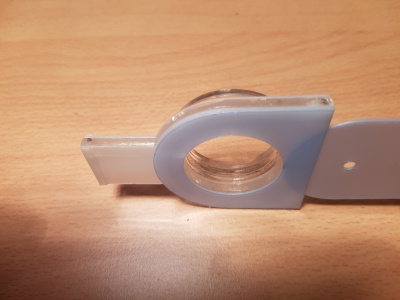
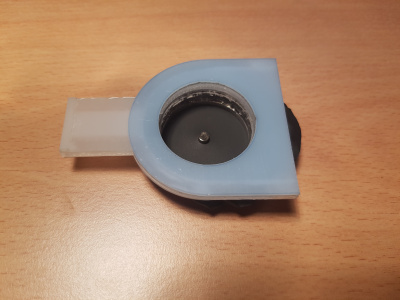
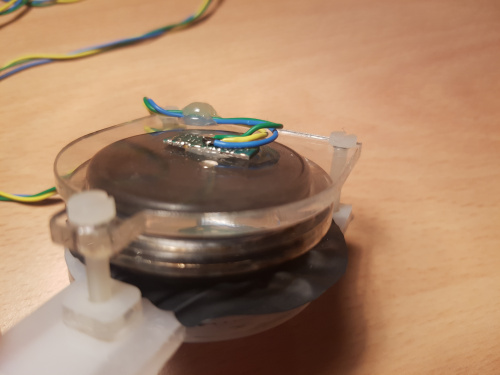
| + | A major issue with many (commercially) breath controllers is the cleaning of the device. As moisture from breath accumulates fast, I wanted a breath controller that can be cleaned and dried easily - even the pressure sensor itself. My design avoids tubing and by removing a slider, the inner parts of the pressure sensor is accessible for easy cleaning and drying. If you remove the top plate with the hall-sensor everything can be rinsed under water. | ||
| + | |||
| + | [[Datei:MembraneBreathCtrlPlexiGluedView2.jpg|400px]] | ||
| + | [[Datei:MembraneBreathCtrlPlexiGluedView9.jpg|400px]] | ||
| + | |||
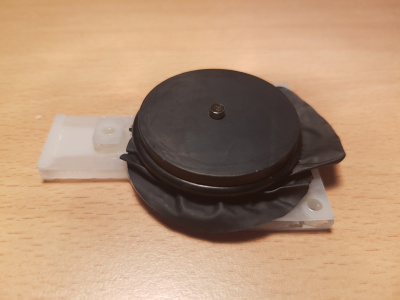
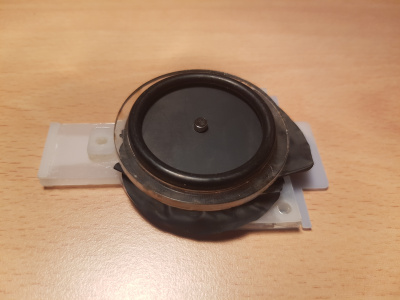
| + | The membrane consists of a circular patch cut from a rubber glove (I used a black Nitril glove). A small magnet is placed on top of the membrane and fixed using another magnet on the opposite side. The membrane is held in place using a rubber O-Ring and a press-fit acrylic ring on top - so the membrane can be easily replaced without any gluing. | ||
| + | |||
| + | [[Datei:MembraneBreathCtrlPlexiGluedView7.jpg|400px]] | ||
| + | [[Datei:MembraneBreathCtrlPlexiGluedView8.jpg|400px]] | ||
| + | |||
| + | === Calibration === | ||
| + | The software uses an automatic calibration of the base-line every time no pressure is detected. So even after replacing the membrane you usually don't have to re-calibrate the device manually. On the first setup you have to define by a single number the sensitivity of your setup (mainly dependent on you hall sensor, magnets and distance magnet vs hall-sensor) so that the maximum blow (where usually the membrane magnet hits the top acrylic plate) outputs a CC value of up to 127. | ||
| + | |||
| + | [[Datei:MembraneBreathCtrlMagnetUnderHallSensor.jpg|500px]] | ||
=== Instruments === | === Instruments === | ||
| − | If you own Native Instruments Reaktor, I like to recommend the free community instruments especially the "Silverwood" ones from Chef Singer. | + | If you own Native Instruments Reaktor, I like to recommend the free community instruments especially the "Silverwood" ones from Chef Singer. [https://www.native-instruments.com/de/reaktor-community/reaktor-user-library/entry/show/12303/ Silverwood Flute], [https://www.native-instruments.com/de/reaktor-community/reaktor-user-library/entry/show/7854/ Silverwood Clarinets] as well as [https://www.native-instruments.com/de/reaktor-community/reaktor-user-library/entry/show/12419/ Silverwood Tenor Sax] are very good sounding instruments as they are using pysical models to synthesize those instruments. Don't forget to add a little reverb to make them sound really great. |
| − | Also other sample-based instruments, especially strings but also organs, can be articulated much nicer using a breath-controller. Often expression (CC11) or breath control (CC2) is supported - so find out. You can change the Arduino code to use CC11 instead of CC2 if you like, I prefer a little M4L device to clone CC2 to CC11 for this purpose... | + | Also other sample-based instruments, especially strings but also organs, can be articulated much nicer using a breath-controller. Often expression (CC11) or breath control (CC2) is supported - so find out. You can change the Arduino code to use CC11 instead of CC2 if you like, I prefer a little M4L device to clone CC2 to CC11 for this purpose... |
| + | == Joystick == | ||
| + | I have added a X/Y Joystick to add the possibility to change another 4 different Control Changes (CC) during my performance. This joystick is easy to get from usual internet locations. However, the joystick I used on the picture is crap as it turned out that is only has a extremely small analog-functioning area in each direction. Despite this, it is easy to connect and uses only 2 analog inputs as well as VCC and GND (+ optional button). | ||
| + | |||
| + | See (and adjust) the source code to see how I mapped directions to different CCs. | ||
| + | |||
| + | == Optical metronome == | ||
| + | If you use Ableton Live, you often need a metronome. However, the click-clack sound is annoying, so you can use my device to get an optical metronome. Under Ableton Live Preferences enable the "Sync" box to the output of the Midi-Device where this thing is hooked up to. By that, Ableton sends different synchronization commands via Midi to this device and these are used in the Arduino-Code to keep a Song-Position-Counter in Sync with the DAW performance. On every first Beat the LED flashes bright in green and on every 2nd, 3rd and 4th beat the LED flashed less bright in red. | ||
| + | |||
| + | If you don't like to use the LED that way, you can turn off the "Sync" output of Ableton and control the LED manually by sending the notes C, D and E. The velocity of these notes controls the brightness of the red, green and blue LED color components. | ||
== How it is build == | == How it is build == | ||
Usually people (like me) use instructions like this only for own inspirations, so this is not meant to be a full "how-to-build" instruction, but it should give you enough insights to do so if you want. In the rare case you really build this and make it to work please drop us a mail :-) | Usually people (like me) use instructions like this only for own inspirations, so this is not meant to be a full "how-to-build" instruction, but it should give you enough insights to do so if you want. In the rare case you really build this and make it to work please drop us a mail :-) | ||
| + | |||
| + | [[Datei:MembraneBreathCtrlParts.jpg|400px]] | ||
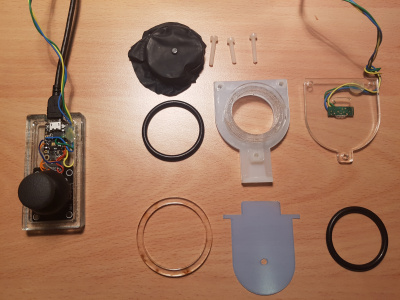
All parts are laser-cut from a very thin (0.5mm) like acrylic sheet and a thicker (4mm) acrylic plate. The 0.5mm acrylic is more like a foil and much more flexible than the 4mm glass like sheets. These are the files with the laser cut parts made with Inkscape: | All parts are laser-cut from a very thin (0.5mm) like acrylic sheet and a thicker (4mm) acrylic plate. The 0.5mm acrylic is more like a foil and much more flexible than the 4mm glass like sheets. These are the files with the laser cut parts made with Inkscape: | ||
| Zeile 52: | Zeile 77: | ||
Datei:MembraneBreathCtrlPlexiGluedView10.jpg | Datei:MembraneBreathCtrlPlexiGluedView10.jpg | ||
</gallery> | </gallery> | ||
| + | |||
| + | == Source code == | ||
| + | You need Arduino to compile this and you need to [https://learn.adafruit.com/adafruit-trinket-m0-circuitpython-arduino/arduino-ide-setup install the components needed to use the Adafruit Trinket M0] in Arduino as well as the extra-libraries in the beginning of the source code using the Library Manager of Arduino. I disliked that my self-build Midi-Devices showed up all with the default Adafruit name, so I changed the name. This needs patching of an Arduino internal file - see the header of the source-code how to do that. | ||
| + | <pre> | ||
| + | // Runs on a Adafruit Trinket M0 | ||
| + | // | ||
| + | // Midi Breath-Controller with automated base-line algorithm | ||
| + | // Midi Analog stick (4 different CCs) | ||
| + | // Midi optical metronome for DAW (if midi sync data is send to this device) | ||
| + | // Midi controllable RGB (velocities of C3,D3,E3) | ||
| + | // | ||
| + | // MIT license, Lutz Lisseck 2022-01 | ||
| + | |||
| + | // Set Midi-Device name in /Users/../Library/Arduino15/packages/adafruit/hardware/samd/.../boards.txt | ||
| + | // Change PID: adafruit_trinket_m0.build.pid=0x831E | ||
| + | // Change Name: adafruit_trinket_m0.build.usb_product="AirMembrane" | ||
| + | |||
| + | // !! Install these in Arduino library manager !! | ||
| + | #include "MIDIUSB.h" | ||
| + | #include <elapsedMillis.h> | ||
| + | #include <Adafruit_DotStar.h> | ||
| + | |||
| + | Adafruit_DotStar strip(1,7,8, DOTSTAR_BGR); // Trinket internal dotstar | ||
| + | |||
| + | // connect like these, button not used yet | ||
| + | #define PRESSURE_INPUT A2 | ||
| + | #define POTIX A3 | ||
| + | #define POTIY A4 | ||
| + | #define POTIBUTTON 2 | ||
| + | |||
| + | |||
| + | void noteOn(byte channel, byte pitch, byte velocity) { | ||
| + | // First parameter is the event type (0x09 = note on, 0x08 = note off). | ||
| + | // Second parameter is note-on/note-off, combined with the channel. | ||
| + | // Channel can be anything between 0-15. Typically reported to the user as 1-16. | ||
| + | // Third parameter is the note number (48 = middle C). | ||
| + | // Fourth parameter is the velocity (64 = normal, 127 = fastest). | ||
| + | midiEventPacket_t noteOn = {0x09, 0x90 | channel, pitch, velocity}; | ||
| + | MidiUSB.sendMIDI(noteOn); | ||
| + | } | ||
| + | |||
| + | void noteOff(byte channel, byte pitch, byte velocity) { | ||
| + | midiEventPacket_t noteOff = {0x08, 0x80 | channel, pitch, velocity}; | ||
| + | MidiUSB.sendMIDI(noteOff); | ||
| + | } | ||
| + | |||
| + | void controlChange(byte channel, byte control, byte value) { | ||
| + | // First parameter is the event type (0x0B = control change). | ||
| + | // Second parameter is the event type, combined with the channel. | ||
| + | // Third parameter is the control number number (0-119). | ||
| + | // Fourth parameter is the control value (0-127). | ||
| + | midiEventPacket_t event = {0x0B, 0xB0 | channel, control, value}; | ||
| + | MidiUSB.sendMIDI(event); | ||
| + | } | ||
| + | |||
| + | void setup() { | ||
| + | Serial.begin(115200); | ||
| + | strip.begin(); // Initialize pins for output | ||
| + | strip.setBrightness(80); | ||
| + | strip.setPixelColor(0, 0x001000); // green | ||
| + | strip.show(); | ||
| + | pinMode(13, OUTPUT); | ||
| + | pinMode(POTIBUTTON, INPUT_PULLUP); | ||
| + | } | ||
| + | |||
| + | // This will read analog stick and send position changes to host | ||
| + | // up: CC1 (higher increases expression) | ||
| + | // down: CC7 (lower lowers volume) | ||
| + | // left: CC11, right CC4 | ||
| + | void readPotis() { | ||
| + | static elapsedMicros potiTimer; | ||
| + | static int upOld = 0; | ||
| + | static int downOld = 0; | ||
| + | static int leftOld = 0; | ||
| + | static int rightOld = 0; | ||
| + | int up, down, left, right; | ||
| + | |||
| + | // check potis every 10ms (avoid too many updates send to host) | ||
| + | if(potiTimer > 10000L) { | ||
| + | potiTimer = 0; | ||
| + | int pX = analogRead(POTIX); | ||
| + | int pY = analogRead(POTIY); | ||
| + | |||
| + | if(pX >= 525) { | ||
| + | down = constrain((pX - 525)/4,0,127); | ||
| + | } else if(pX <= 505) { | ||
| + | up = constrain((505 - pX)/4,0,127); | ||
| + | } else { | ||
| + | up = 0; | ||
| + | down = 0; | ||
| + | } | ||
| + | if(up != upOld) { | ||
| + | upOld = up; | ||
| + | controlChange(0, 1, up); | ||
| + | } | ||
| + | if(down != downOld) { | ||
| + | downOld = down; | ||
| + | controlChange(0, 7, 127-down); | ||
| + | } | ||
| + | |||
| + | if(pY >= 525) { | ||
| + | left = constrain((pY - 525)/4,0,127); | ||
| + | } else if(pY <= 505) { | ||
| + | right = constrain((505 - pY)/4,0,127); | ||
| + | } else { | ||
| + | right = 0; | ||
| + | left = 0; | ||
| + | } | ||
| + | if(right != rightOld) { | ||
| + | rightOld = right; | ||
| + | controlChange(0, 4, right); | ||
| + | } | ||
| + | if(left != leftOld) { | ||
| + | leftOld = left; | ||
| + | controlChange(0, 11, left); | ||
| + | } | ||
| + | |||
| + | } | ||
| + | } | ||
| + | |||
| + | // This will read the membrane position and sends it to host as CC2 | ||
| + | void readMembrane() { | ||
| + | static const int avglen = 100; // read and average analogReads to remove noise | ||
| + | static long avgsum = 0; | ||
| + | static elapsedMillis max_ms; | ||
| + | static elapsedMillis min_ms; | ||
| + | static int max_val = 0; | ||
| + | static int min_val = 32000; | ||
| + | static float base_avg = 414.0; | ||
| + | const float sensitivity = 0.85; // adjust sensitivity here | ||
| + | static int old_ccval = 0; | ||
| + | int ccval; | ||
| + | |||
| + | static elapsedMicros pressTimer; | ||
| + | |||
| + | // check Membrane every 5ms (avoid too many updates send to host) | ||
| + | if(pressTimer > 5000L) { | ||
| + | int val; | ||
| + | int diff; | ||
| + | pressTimer = 0; | ||
| + | avgsum = 0; | ||
| + | for(int i=0;i<avglen;i++) avgsum += analogRead(PRESSURE_INPUT); | ||
| + | val = avgsum / avglen; | ||
| + | |||
| + | // update max and min val | ||
| + | if(val > max_val) { | ||
| + | max_val = val; | ||
| + | max_ms = 0; | ||
| + | } | ||
| + | if(val < min_val) { | ||
| + | min_val = val; | ||
| + | min_ms = 0; | ||
| + | } | ||
| + | |||
| + | // shrink max and min after some time | ||
| + | if(min_ms > 100) { | ||
| + | min_ms = 0; | ||
| + | min_val++; | ||
| + | } | ||
| + | if(max_ms > 100) { | ||
| + | max_ms = 0; | ||
| + | max_val--; | ||
| + | } | ||
| + | |||
| + | // only if diff small enough adapt baseline slowly | ||
| + | // this will find no-air level automatically after some time of not blowing | ||
| + | // yellow LED goes off when long enough no blowing | ||
| + | diff = max_val - min_val; | ||
| + | if(diff < 6) { | ||
| + | base_avg = base_avg * 0.999 + val * 0.001; | ||
| + | ccval = 0; | ||
| + | digitalWrite(13, LOW); | ||
| + | } else { | ||
| + | ccval = int(((float)val - (float)base_avg) * sensitivity); | ||
| + | if(ccval < 0) ccval = 0; | ||
| + | if(ccval > 127) ccval = 127; | ||
| + | digitalWrite(13, HIGH); | ||
| + | } | ||
| + | |||
| + | //Serial.print(val); Serial.print(","); | ||
| + | //Serial.print(max_val); Serial.print(","); | ||
| + | //Serial.print(min_val); Serial.print(","); | ||
| + | //Serial.print(base_avg); Serial.print(","); | ||
| + | //Serial.print(diff); Serial.print(","); | ||
| + | |||
| + | //Serial.print(ccval); | ||
| + | //Serial.println(' '); | ||
| + | |||
| + | if(old_ccval != ccval) { | ||
| + | controlChange(0, 2, constrain(ccval,0,127)); | ||
| + | } | ||
| + | |||
| + | old_ccval = ccval; | ||
| + | } | ||
| + | |||
| + | } | ||
| + | |||
| + | // Tracking of song-position, pulses per quarter note. Each beat has 24 pulses. | ||
| + | // Tempo is based on software inner BPM. | ||
| + | int32_t songpos = 0; | ||
| + | |||
| + | void loop() { | ||
| + | midiEventPacket_t rx; | ||
| + | |||
| + | readPotis(); | ||
| + | readMembrane(); | ||
| + | MidiUSB.flush(); // force writing midi data to host immediately | ||
| + | |||
| + | //digitalWrite(13, digitalRead(POTIBUTTON)); | ||
| + | |||
| + | // read midi data from host if available | ||
| + | do { | ||
| + | rx = MidiUSB.read(); | ||
| + | if (rx.header != 0) { | ||
| + | /* | ||
| + | Serial.print("Received: "); | ||
| + | Serial.print(rx.header, HEX); | ||
| + | Serial.print("-"); | ||
| + | Serial.print(rx.byte1, HEX); | ||
| + | Serial.print("-"); | ||
| + | Serial.print(rx.byte2, HEX); | ||
| + | Serial.print("-"); | ||
| + | Serial.println(rx.byte3, HEX); | ||
| + | */ | ||
| + | |||
| + | // *** LED update (RGB can be set via velocities of notes C,D,E) *** | ||
| + | if((rx.byte1 == 0x80) || (rx.byte1 == 0x90)) { | ||
| + | uint8_t val = rx.byte3; | ||
| + | uint32_t pixval = strip.getPixelColor(0); | ||
| + | if(rx.byte1 == 0x80) val = 0; | ||
| + | // keys: R=C, G=D, B=E | ||
| + | if(rx.byte2 == 0x40) { pixval &= 0x00FFFF00u; pixval |= (uint32_t)val; } | ||
| + | if(rx.byte2 == 0x3E) { pixval &= 0x00FF00FFu; pixval |= (uint32_t)val<<8; } | ||
| + | if(rx.byte2 == 0x3C) { pixval &= 0x0000FFFFu; pixval |= (uint32_t)val<<16; } | ||
| + | strip.setPixelColor(0, pixval); | ||
| + | strip.show(); | ||
| + | } | ||
| + | |||
| + | // *** Flash RGB LED according host metronome *** | ||
| + | // In Ableton Live activate "Sync" in Midi-Out preferences on this device | ||
| + | // Count pulses | ||
| + | if(rx.byte1 == 0xF8){ | ||
| + | songpos++; | ||
| + | } | ||
| + | // Set song position | ||
| + | else if(rx.byte1 == 0xF2){ | ||
| + | uint16_t pos = rx.byte2 + 128 * rx.byte3; | ||
| + | songpos = pos * 6; | ||
| + | } | ||
| + | // ignore Stop (could turn off LED if needed) | ||
| + | else if(rx.byte1 == 0xFC){ | ||
| + | //noteOff(1,48,0); | ||
| + | //MidiUSB.flush(); | ||
| + | } | ||
| + | // Update LED on Start, Continue and update song position | ||
| + | if((rx.byte1 == 0xF8) || (rx.byte1 == 0xFA) || (rx.byte1 == 0xFB)){ | ||
| + | // Update LED, check if it is beat 1, 2, 3 or 4 | ||
| + | if(songpos % 24 == 0) { | ||
| + | // Check if it is beat 1 | ||
| + | if(songpos % (24*4) == 0) { | ||
| + | strip.setPixelColor(0, 0x0000FF00); | ||
| + | } else { | ||
| + | strip.setPixelColor(0, 0x00200000); | ||
| + | } | ||
| + | } else { | ||
| + | strip.setPixelColor(0, 0); | ||
| + | } | ||
| + | strip.show(); | ||
| + | } | ||
| + | |||
| + | |||
| + | } | ||
| + | } while (rx.header != 0); | ||
| + | |||
| + | } | ||
| + | </pre> | ||
[[Kategorie:Projekte]] | [[Kategorie:Projekte]] | ||
Aktuelle Version vom 8. Januar 2022, 01:07 Uhr
Inhaltsverzeichnis
Features
- USB-Midi Breath controller
- Send control change messages via Midi to DAW (CC2 breath control)
- Fast and responsive (200 Hz CC2 update rate)
- Easy to clean and easy to dry - pressure sensor can be opened via a slide
- Based on a linear Hall-sensor and two magnets on a membrane cut out of a rubber glove
- USB-Midi X/Y Joystick
- Sends 4 additional CCs
- USB-Midi Optical metronome
- Uses internal RGB LED
- Indicates Beat 1, 2, 3, 4 of optically (no annoying click-sound)
- Easy to use with Ableton Live - just activate "Sync" on Midi-Out in Preferences
- Alternative control of RGB via note velocity (send notes C, D, E to device, velocity = brightness)
- Full DIY
- Based on Adafruit Trinket M0
- All parts laser cut from 0.5 and 4mm acrylics
- No hard-to-get special pressure sensor
Breath controller
Background
To play wind instruments more realistic if you are a keyboard player, a breath-controller is a good option: You select the notes to play with your keyboard, but the sound is triggered and articulated based on your breath. This is not only useful for flute-like instruments, but also for other instruments like brass and strings that can articulate a note more then just on-off.
Cleaning
A major issue with many (commercially) breath controllers is the cleaning of the device. As moisture from breath accumulates fast, I wanted a breath controller that can be cleaned and dried easily - even the pressure sensor itself. My design avoids tubing and by removing a slider, the inner parts of the pressure sensor is accessible for easy cleaning and drying. If you remove the top plate with the hall-sensor everything can be rinsed under water.
The membrane consists of a circular patch cut from a rubber glove (I used a black Nitril glove). A small magnet is placed on top of the membrane and fixed using another magnet on the opposite side. The membrane is held in place using a rubber O-Ring and a press-fit acrylic ring on top - so the membrane can be easily replaced without any gluing.
Calibration
The software uses an automatic calibration of the base-line every time no pressure is detected. So even after replacing the membrane you usually don't have to re-calibrate the device manually. On the first setup you have to define by a single number the sensitivity of your setup (mainly dependent on you hall sensor, magnets and distance magnet vs hall-sensor) so that the maximum blow (where usually the membrane magnet hits the top acrylic plate) outputs a CC value of up to 127.
Instruments
If you own Native Instruments Reaktor, I like to recommend the free community instruments especially the "Silverwood" ones from Chef Singer. Silverwood Flute, Silverwood Clarinets as well as Silverwood Tenor Sax are very good sounding instruments as they are using pysical models to synthesize those instruments. Don't forget to add a little reverb to make them sound really great.
Also other sample-based instruments, especially strings but also organs, can be articulated much nicer using a breath-controller. Often expression (CC11) or breath control (CC2) is supported - so find out. You can change the Arduino code to use CC11 instead of CC2 if you like, I prefer a little M4L device to clone CC2 to CC11 for this purpose...
Joystick
I have added a X/Y Joystick to add the possibility to change another 4 different Control Changes (CC) during my performance. This joystick is easy to get from usual internet locations. However, the joystick I used on the picture is crap as it turned out that is only has a extremely small analog-functioning area in each direction. Despite this, it is easy to connect and uses only 2 analog inputs as well as VCC and GND (+ optional button).
See (and adjust) the source code to see how I mapped directions to different CCs.
Optical metronome
If you use Ableton Live, you often need a metronome. However, the click-clack sound is annoying, so you can use my device to get an optical metronome. Under Ableton Live Preferences enable the "Sync" box to the output of the Midi-Device where this thing is hooked up to. By that, Ableton sends different synchronization commands via Midi to this device and these are used in the Arduino-Code to keep a Song-Position-Counter in Sync with the DAW performance. On every first Beat the LED flashes bright in green and on every 2nd, 3rd and 4th beat the LED flashed less bright in red.
If you don't like to use the LED that way, you can turn off the "Sync" output of Ableton and control the LED manually by sending the notes C, D and E. The velocity of these notes controls the brightness of the red, green and blue LED color components.
How it is build
Usually people (like me) use instructions like this only for own inspirations, so this is not meant to be a full "how-to-build" instruction, but it should give you enough insights to do so if you want. In the rare case you really build this and make it to work please drop us a mail :-)
All parts are laser-cut from a very thin (0.5mm) like acrylic sheet and a thicker (4mm) acrylic plate. The 0.5mm acrylic is more like a foil and much more flexible than the 4mm glass like sheets. These are the files with the laser cut parts made with Inkscape:
- Datei:MembranBreathConttrolThinPlexi.svg for thin (0.5mm) acrylic
- Datei:MembranBreathConttrolThickPlexi.svg for thick (4mm) acrylic
All parts are laser cut and glued with acrylic glue.
- MembraneBreathCtrl assembly
Source code
You need Arduino to compile this and you need to install the components needed to use the Adafruit Trinket M0 in Arduino as well as the extra-libraries in the beginning of the source code using the Library Manager of Arduino. I disliked that my self-build Midi-Devices showed up all with the default Adafruit name, so I changed the name. This needs patching of an Arduino internal file - see the header of the source-code how to do that.
// Runs on a Adafruit Trinket M0
//
// Midi Breath-Controller with automated base-line algorithm
// Midi Analog stick (4 different CCs)
// Midi optical metronome for DAW (if midi sync data is send to this device)
// Midi controllable RGB (velocities of C3,D3,E3)
//
// MIT license, Lutz Lisseck 2022-01

// Set Midi-Device name in /Users/../Library/Arduino15/packages/adafruit/hardware/samd/.../boards.txt
// Change PID: adafruit_trinket_m0.build.pid=0x831E
// Change Name: adafruit_trinket_m0.build.usb_product="AirMembrane"

// !! Install these in Arduino library manager !!
#include "MIDIUSB.h"
#include <elapsedMillis.h>
#include <Adafruit_DotStar.h>

Adafruit_DotStar strip(1,7,8, DOTSTAR_BGR); // Trinket internal dotstar

// connect like these, button not used yet
#define PRESSURE_INPUT   A2
#define POTIX            A3
#define POTIY            A4
#define POTIBUTTON       2


void noteOn(byte channel, byte pitch, byte velocity) {
  // First parameter is the event type (0x09 = note on, 0x08 = note off).
  // Second parameter is note-on/note-off, combined with the channel.
  // Channel can be anything between 0-15. Typically reported to the user as 1-16.
  // Third parameter is the note number (48 = middle C).
  // Fourth parameter is the velocity (64 = normal, 127 = fastest).
  midiEventPacket_t noteOn = {0x09, 0x90 | channel, pitch, velocity};
  MidiUSB.sendMIDI(noteOn);
}

void noteOff(byte channel, byte pitch, byte velocity) {
  midiEventPacket_t noteOff = {0x08, 0x80 | channel, pitch, velocity};
  MidiUSB.sendMIDI(noteOff);
}

void controlChange(byte channel, byte control, byte value) {
  // First parameter is the event type (0x0B = control change).
  // Second parameter is the event type, combined with the channel.
  // Third parameter is the control number number (0-119).
  // Fourth parameter is the control value (0-127).
  midiEventPacket_t event = {0x0B, 0xB0 | channel, control, value};
  MidiUSB.sendMIDI(event);
}

void setup() {
  Serial.begin(115200);
  strip.begin(); // Initialize pins for output
  strip.setBrightness(80);
  strip.setPixelColor(0, 0x001000); // green
  strip.show();
  pinMode(13, OUTPUT);
  pinMode(POTIBUTTON, INPUT_PULLUP);
}

// This will read analog stick and send position changes to host
// up:    CC1 (higher increases expression)
// down:  CC7 (lower lowers volume)
// left:  CC11, right CC4
void readPotis() {
  static elapsedMicros potiTimer;
  static int upOld = 0;
  static int downOld = 0;
  static int leftOld = 0;
  static int rightOld = 0;
  int up, down, left, right;

  // check potis every 10ms (avoid too many updates send to host)
  if(potiTimer > 10000L) {
    potiTimer = 0;
    int pX = analogRead(POTIX);
    int pY = analogRead(POTIY);

    if(pX >= 525) {
      down = constrain((pX - 525)/4,0,127);
    } else if(pX <= 505) {
      up = constrain((505 - pX)/4,0,127);
    } else {
      up = 0;
      down = 0;
    }
    if(up != upOld) {
      upOld = up;
      controlChange(0, 1, up);
    }
    if(down != downOld) {
      downOld = down;
      controlChange(0, 7, 127-down);
    }

    if(pY >= 525) {
      left = constrain((pY - 525)/4,0,127);
    } else if(pY <= 505) {
      right = constrain((505 - pY)/4,0,127);
    } else {
      right = 0;
      left = 0;
    }
    if(right != rightOld) {
      rightOld = right;
      controlChange(0, 4, right);
    }
    if(left != leftOld) {
      leftOld = left;
      controlChange(0, 11, left);
    }

  }
}

// This will read the membrane position and sends it to host as CC2
void readMembrane() {
  static const int avglen = 100; // read and average analogReads to remove noise
  static long avgsum = 0;
  static elapsedMillis max_ms;
  static elapsedMillis min_ms;
  static int max_val = 0;
  static int min_val = 32000;
  static float base_avg = 414.0;
  const float sensitivity = 0.85; // adjust sensitivity here
  static int old_ccval = 0;
  int ccval;

  static elapsedMicros pressTimer;

  // check Membrane every 5ms (avoid too many updates send to host)
  if(pressTimer > 5000L) {
    int val;
    int diff;
    pressTimer = 0;
    avgsum = 0;
    for(int i=0;i<avglen;i++) avgsum += analogRead(PRESSURE_INPUT);
    val = avgsum / avglen;

    // update max and min val
    if(val > max_val) {
      max_val = val;
      max_ms = 0;
    }
    if(val < min_val) {
      min_val = val;
      min_ms = 0;
    }

    // shrink max and min after some time
    if(min_ms > 100) {
      min_ms = 0;
      min_val++;
    }
    if(max_ms > 100) {
      max_ms = 0;
      max_val--;
    }

    // only if diff small enough adapt baseline slowly
    // this will find no-air level automatically after some time of not blowing
    // yellow LED goes off when long enough no blowing
    diff = max_val - min_val;
    if(diff < 6) {
      base_avg = base_avg * 0.999 + val * 0.001;
      ccval = 0;
      digitalWrite(13, LOW);
    } else {
      ccval = int(((float)val - (float)base_avg) * sensitivity);
      if(ccval < 0) ccval = 0;
      if(ccval > 127) ccval = 127;
      digitalWrite(13, HIGH);
    }

    //Serial.print(val); Serial.print(",");
    //Serial.print(max_val); Serial.print(",");
    //Serial.print(min_val); Serial.print(",");
    //Serial.print(base_avg); Serial.print(",");
    //Serial.print(diff); Serial.print(",");

    //Serial.print(ccval);
    //Serial.println(' ');

    if(old_ccval != ccval) {
      controlChange(0, 2, constrain(ccval,0,127));
    }

    old_ccval = ccval;
  }

}

// Tracking of song-position, pulses per quarter note. Each beat has 24 pulses.
// Tempo is based on software inner BPM.
int32_t songpos = 0;

void loop() {
  midiEventPacket_t rx;

  readPotis();
  readMembrane();
  MidiUSB.flush(); // force writing midi data to host immediately

  //digitalWrite(13, digitalRead(POTIBUTTON));

  // read midi data from host if available
  do {
    rx = MidiUSB.read();
    if (rx.header != 0) {
      /*
      Serial.print("Received: ");
      Serial.print(rx.header, HEX);
      Serial.print("-");
      Serial.print(rx.byte1, HEX);
      Serial.print("-");
      Serial.print(rx.byte2, HEX);
      Serial.print("-");
      Serial.println(rx.byte3, HEX);
      */

      // *** LED update (RGB can be set via velocities of notes C,D,E) ***
      if((rx.byte1 == 0x80) || (rx.byte1 == 0x90)) {
        uint8_t val = rx.byte3;
        uint32_t pixval = strip.getPixelColor(0);
        if(rx.byte1 == 0x80) val = 0;
        // keys: R=C, G=D, B=E
        if(rx.byte2 == 0x40) { pixval &= 0x00FFFF00u; pixval |= (uint32_t)val; }
        if(rx.byte2 == 0x3E) { pixval &= 0x00FF00FFu; pixval |= (uint32_t)val<<8; }
        if(rx.byte2 == 0x3C) { pixval &= 0x0000FFFFu; pixval |= (uint32_t)val<<16; }
        strip.setPixelColor(0, pixval);
        strip.show();
      }

      // *** Flash RGB LED according host metronome ***
      // In Ableton Live activate "Sync" in Midi-Out preferences on this device
      // Count pulses
      if(rx.byte1 == 0xF8){
        songpos++;
      }
      // Set song position
      else if(rx.byte1 == 0xF2){
        uint16_t pos = rx.byte2 + 128 * rx.byte3;
        songpos = pos * 6;
      }
      // ignore Stop (could turn off LED if needed)
      else if(rx.byte1 == 0xFC){
        //noteOff(1,48,0);
        //MidiUSB.flush();
      }
      // Update LED on Start, Continue and update song position
      if((rx.byte1 == 0xF8) || (rx.byte1 == 0xFA) || (rx.byte1 == 0xFB)){
        // Update LED, check if it is beat 1, 2, 3 or 4
        if(songpos % 24 == 0) {
          // Check if it is beat 1
          if(songpos % (24*4) == 0) {
            strip.setPixelColor(0, 0x0000FF00);
          } else {
            strip.setPixelColor(0, 0x00200000);
          }
        } else {
          strip.setPixelColor(0, 0);
        }
        strip.show();
      }


    }
  } while (rx.header != 0);

}
