DCEM (Diskussion | Beiträge) (→Background) |
DCEM (Diskussion | Beiträge) (→Background) |
||
| (4 dazwischenliegende Versionen desselben Benutzers werden nicht angezeigt) | |||
| Zeile 6: | Zeile 6: | ||
I had the idea to design a Arduino Nano compatible board with an microSD slot. | I had the idea to design a Arduino Nano compatible board with an microSD slot. | ||
| − | On one fateful Monday evening I talked to [[Benutzer:Tut|Tut]],[[Benutzer: Shintaro | Shintaro]] and [[Benutzer: LeandraChristine | LeandraChristine]] about this idea. | + | On one fateful Monday evening I talked to [[Benutzer:Tut|Tut]], [[Benutzer:Shintaro|Shintaro]] and [[Benutzer:LeandraChristine|LeandraChristine]] about this idea. |
Soon after that we were discussing the problems of the Arduino PIN design, which is not a proper 0.1 inch grid. | Soon after that we were discussing the problems of the Arduino PIN design, which is not a proper 0.1 inch grid. | ||
| Zeile 39: | Zeile 39: | ||
== Design decisions explained == | == Design decisions explained == | ||
There are lots of Arduino Shields out there. When I started to think about implementing this idea I thought being compatible to old shields would be great, since the “Skyline Shield Design” is almost certainly going to stay niche product. | There are lots of Arduino Shields out there. When I started to think about implementing this idea I thought being compatible to old shields would be great, since the “Skyline Shield Design” is almost certainly going to stay niche product. | ||
| + | |||
The original Arduino Shield design has this off by 0,05 inch flaw, also I think it is just too big. I prefer the Arduino Nano or the Arduino Micro design. | The original Arduino Shield design has this off by 0,05 inch flaw, also I think it is just too big. I prefer the Arduino Nano or the Arduino Micro design. | ||
| + | |||
With these small boards (Nano, Micro, Mini etc.) it is usual to put shields below the controller board. | With these small boards (Nano, Micro, Mini etc.) it is usual to put shields below the controller board. | ||
At some point and lots of changes in the PIN design I realized that when I put my shields on top of the controller board I could easily achieve compatibility to all the other shields. | At some point and lots of changes in the PIN design I realized that when I put my shields on top of the controller board I could easily achieve compatibility to all the other shields. | ||
| + | |||
The [[HackFFM-Duino Nano]] has the Arduino Nano pinout on the bottom and the Skyline Shield pinout on top. | The [[HackFFM-Duino Nano]] has the Arduino Nano pinout on the bottom and the Skyline Shield pinout on top. | ||
Aktuelle Version vom 20. Juli 2014, 23:44 Uhr
Background
After our last soldering seminar where some people decided to solder the isolated versatile FTDI I realized that this was probably not the best skill level for beginners.
I had the idea to design a Arduino Nano compatible board with an microSD slot.
On one fateful Monday evening I talked to Tut, Shintaro and LeandraChristine about this idea.
Soon after that we were discussing the problems of the Arduino PIN design, which is not a proper 0.1 inch grid.
We started to collect ideas on how a “really nice” shield design could be realized. At some point a crucial idea came to mind. If you place a shift register on every shield and use it to toggle the SPI chip select u could stack an indefinite number of shields.
I liked this idea so much that I decided to realize it.
We will see if the great potential I can see in it can be realized :)
Features
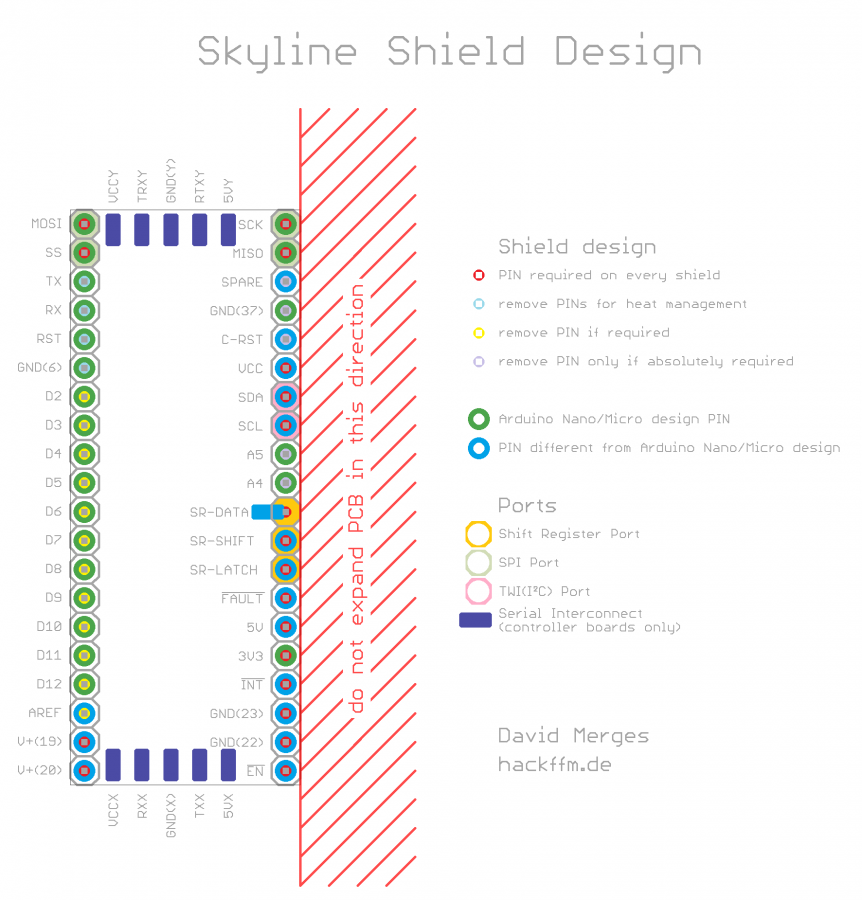
• Shift register pins that allow stacking an indefinite number of shields. Shield configuration and SPI chip select are provided from shift registers on the shields.
• designated PINS for SPI and TWI
• PINS for FAULT and INTTERUPT (ideally these can be configured via shift register either)
• ENABLE pin, so you can easily design an “Emergency Off” button
• leave out 16 pins in the left row and you get lots of routing space or space for connectors (you will lose access to these pins of cause, so you will have to think about the stacking order)
• designated PINs for heat management (leave them out to get space for airflow and/or heatsink)
• 5V, 3.3V and VCC PINs
• Serial Interconnect pins, so you can easily implement a multi-processor platform
• raw power PINSs that can handle more than 9V (at least 24V)
Design decisions explained
There are lots of Arduino Shields out there. When I started to think about implementing this idea I thought being compatible to old shields would be great, since the “Skyline Shield Design” is almost certainly going to stay niche product.
The original Arduino Shield design has this off by 0,05 inch flaw, also I think it is just too big. I prefer the Arduino Nano or the Arduino Micro design.
With these small boards (Nano, Micro, Mini etc.) it is usual to put shields below the controller board. At some point and lots of changes in the PIN design I realized that when I put my shields on top of the controller board I could easily achieve compatibility to all the other shields.
The HackFFM-Duino Nano has the Arduino Nano pinout on the bottom and the Skyline Shield pinout on top.
License
Licensing CC v3.0 Share-Alike (http://creativecommons.org/licenses/by-sa/3.0/)
