SimpleSDAudio


Inhaltsverzeichnis
About
Play audio files with your Arduino in decent quality from SD card, only very few additional hardware required.
Features
- 8-Bit PWM output - no external DAC required
- 16-Bit emulation using 2x 8-Bit PWM output - requires only two resistors
- 62.500 kHz (fullrate) / 31.250 kHz (halfrate) sampling rate @ 16 MHz
- 31.250 kHz (fullrate) / 15.625 kHz (halfrate) sampling rate @ 8 Mhz
- PWM output is operating always at fullrate for easier filtering
- Mono, bridge and stereo mode
- RAM usage ~1.3 kByte
- ROM usage ~6.1 kByte
- Integrated SD library (minimal FAT only, optimized for low RAM usage and high performance)
- Works with most SD card shields that are hooked to SPI port
- Easy to use API: 1. init library, 2. select audio file, 3. call play
- Supports SD and SDHC cards formated with FAT16 or FAT32
Restrictions
- Audio file must be converted prior use
- Audio files must reside in root directory of card
- File name of audio file must be in 8.3-format
- Audio file must reside completely non-fragmented on card
- Combination of fullrate and quadro-output actually leads to buffer underruns
- Minimum controller required: ATmega368. ATmega168 is too low on RAM.
Alternatives
Now there is an alternative library called TMRpcm that does something similar: https://github.com/TMRh20/TMRpcm/wiki . This is a little bit easier to use (no conversion of WAV file needed). Here a table with the differences:
| Feature | SimpleSDAudio | TMRpcm |
|---|---|---|
| Highest sampling rate | X | - |
| Native WAV playback (no file conversion needed) | - | X |
| Highly speed-optimized code (using Assembler for audio core) | X | - |
| Using size-optimized minimal SD-FAT library | X | - |
| Universal SD library in the background supporting fragmented files and many other uses | - | X |
| Stereo operation possible | X | X |
| Quad speaker operation possible | X | X |
| Volume setting support | - | X |
So depending on your needs, try the library that best fit your needs. TMRpcm might be easier for beginners. Both libraries should work with the same connections. You can take the information about the connections from here and use the TMRpcm library with that.
You want even more, multi-channel audio playback, digital filters, mixers, DSP functions? Then take a look at the Teensy 3.1 Audio Library using a serious (but still affordable) micro controller but still using the Arduino IDE.
Download
Latest version:
Old versions:
Presentation for SimpleSDAudio (German)
Usage
Quickstart guide
- Install library: Unzip all to your /libraries/ folder.
- Copy the file /libraries/SimpleSDAudio/examples/EXAMPLE.AFM to root folder of a freshly formated SD card (don't use quick format!).
- Connect SD card to your Arduino board (using shield or whatever, SD card's chip select should go to pin 4, all other to SPI pins).
- Connect a speaker or headphone via 100 ohm resistor in series to audio output pin (pin 9 on Arduinos with ATmega328, pin 44 on Arduinos with ATmega1280/2560). Connect other end of speaker to GND.
- Launch Arduino IDE and try example "BareMinimumWithDebug" first.
- You should hear the audio (plays just a few seconds). Activate serial monitor to find some information if it does not work. Maybe you have to adjust SD cards CS pin in sketch.
Software installation guide
Browse to your sketchbook location (see Arduino - File - Preferences). There should be a folder called /libraries/, if not, create a folder and name it exactly like that. Then extract the zip-file preserving the folders and put all into the "libraries" folder that you end up with a structure where the "example" folder is located here: /libraries/SimpleSDAudio/examples/. Now you can start Arduino IDE and find examples for the library under File - Examples - SimpleSDAudio.
To convert audio files for usage with this library read the next paragraph.
Preparation of SD card and conversion of audio files
The audio library uses a very trimmed SD library that uses the FAT only to find the start sector of the files. Therefore the file must be completely non-fragmented on the SD card. The best way to ensure this is to do a fresh and full format of the card (don't use quick format!). After formating the SD card, only copy new files on it. Don't delete files and avoid rename operations that creates file names that doesn't fit into 8.3 format (see http://en.wikipedia.org/wiki/8.3_filename ). All files must placed in root directory as folders are not supported by the audio library.
To convert audio files I suggest the use of SoX from http://sox.sourceforge.net .
Windows users
For Windows users the Sox binaries are already part of the library located in the libraries/SimpleSDAudio/tools folder. Just drag and drop .wav files to the appropriate batch files to start the conversion. The converted files will end up in folder "converted".
Linux users
Linux users should compile SoX from source or use their favorite package manager to install SoX. I recommend to use the following line for conversions:
sox inputfile.wav --norm=-1 -e unsigned-integer -b 8 -r 31250 -c 1 -t raw outputfile.raw
Change the following according to your needs:
- For stereo change -c 1 to -c 2
- For full rate use -r 62500 @ 16MHz, -r 31250 @ 8 MHz
- For half rate use -r 31250 @ 16MHz, -r 15625 @ 8 MHz
The option --norm=-1 is used to avoid bad sounding clipping effects.
File name conventions
Even you could choose any filename and any extension, I suggest using an extension that shows audio rate and stereo or mono mode. In the batch-files I use the following:
8-Bit
- .AFM - Fullrate, mono
- .AFS - Fullrate, stereo
- .AHM - Halfrate, mono
- .AHS - Halfrate, stereo
16-Bit
- .BFM - Fullrate, mono
- .BFS - Fullrate, stereo (not supported)
- .BHM - Halfrate, mono
- .BHS - Halfrate, stereo
Hardware setup
SD card connection
The SD card should be connected to the SPI port of the controller. The chip select pin from the card can be connected to any free digital pin, but if pin 4 is used on Arduinos you don't have to adjust the source code. Many shields with SD card support like Ethernet-Shield will work. You need level conversion circuits from 5V to 3.3V for most Arduinos (except those that run natively on 3.3V) - three resistor dividers are enough. Look at the circuit diagram below how to do it.
According your mode configuration, one or two pins are used for audio output. This pins can not be changed and are different between different Arduino boards. For ATmega168/328 based plattforms those are pins 9 and 10. For ATmega1280/2560 those are pins 44 and 45. For other plattforms look into the file SimpleSDAudio.h.
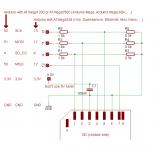
SD card connection with level shifting to standard Arduinos

Audio output connection
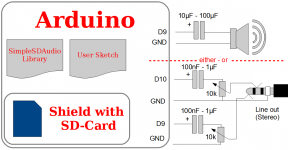
Be careful that the audio output pins are digital ports that carry a positive voltage between 0V and 5V. It is not a good idea to have a DC voltage at line-inputs or smaller speakers as there will be a steady current flow. Therefore at least a resistor and/or a capacitor should be connected in series. For a start use at least 100 ohm or a capacitor between 100nF and 100uF. For line inputs use a voltage divider or poti to reduce the voltage.
Examples for simple 8-bit audio outputs
Rising the audio resolution to something near 16-bit
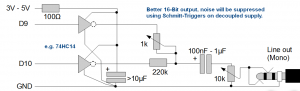
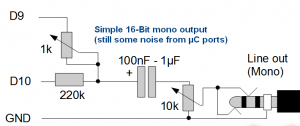
Still unexpensive solution to get nice 16-bit audio output


The 16-bit output is done by operating two 8-bit outputs together: One will provide an 8-bit signal containing the higher 8-bits and the other one contains the lower 8-bits. If you listen to each of those channels separately, you will hear the usual audio on the upper 8-bit outputs but with noticable 8-bit noise especially on quiet audio parts. On the lower 8-bit you will hear just noise. But when you add this noise (reduced in volume by a factor of 256th done by the resistors) to the higher 8-bits then something magic will happen: The 8-bit noise will vanish (but unfortunately often a lot of noise originating from power supply might still be left).
Audio amplifier for loudspeakers
If you want more power, you can build a cheap class-D PWM amplifier based on the 74AC14 (hex Schmitt-trigger inverters). The coils are optional but should be used for RF reject when long cables are used.
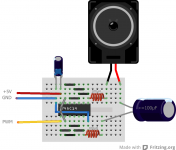
8-bit mono amplifier on breadboard
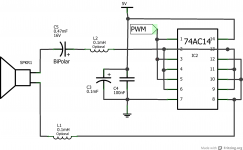
8-bit mono amplifier circuit
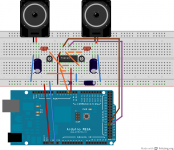
16-bit stereo amp on breadboard, use trimmer to adjust for lowest noise
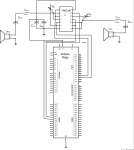
16-bit stereo amp circuit


Build your own SD breadboard adapter
Follow those pictures to build a very cheap SD-card adapter.

You need one single-row and one double-row pinheader cut to 7 pins each.


Using pliers to bend one side of pins < shape. Don't bend other side.
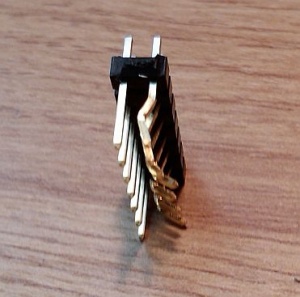
Bend all 7 pins of one row, leave other row non bend. You should end up like this:
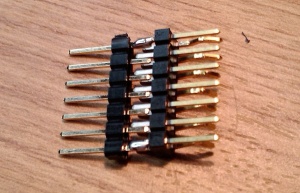
Solder single-row pinheader to non-bend (=still straight) double-row pinheader.
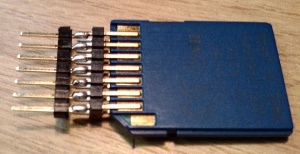
Place card in holder. Card contact should get connected to non-bend (=straight) pins.
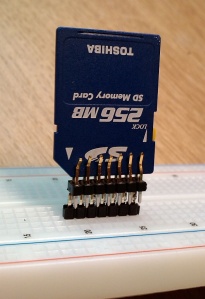
Put everything in your breadboard (front-side view).
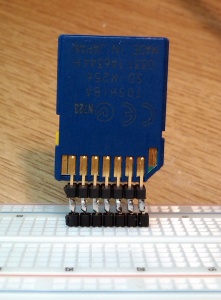
Put everything in your breadboard (back-side view).


API reference
Constants
Here is an overview of the constants used in the library.
#define SSDA_VERSIONSTRING      "1.03"

// Sound Mode Flags
#define SSDA_MODE_FULLRATE      0x00    // 62.500 kHz @ 16 MHz, 31.250 kHz @ 8 MHz
#define SSDA_MODE_HALFRATE      0x10    // 31.250 kHz @ 16 MHz, 15.625 kHz @ 8 MHz

#define SSDA_MODE_MONO          0x00    // Use only 1st PWM pin
#define SSDA_MODE_STEREO        0x01    // Use both PWM pins for stereo output
#define SSDA_MODE_QUADRO	0x04	// Uses four PWM pins for either 4 speakers or Stereo 16 Bit
#define SSDA_MODE_MONO_BRIDGE   0x02    // Use both PWM pins for more power

#define SSDA_MODE_AUTOWORKER	0x80	// Use this and worker is called automatically

// Error codes from SimpleSDAudio, see other sd_l*.h for more error codes
#define SSDA_ERROR_NULL         0x80    // Null pointer
#define SSDA_ERROR_BUFTOSMALL   0x81    // Buffer to small
#define SSDA_ERROR_NOT_INIT     0x82    // System not initialized properly
Class name and default instance
class SdPlayClass { ... }
extern SdPlayClass SdPlay;
The name of the class is SdPlayClass. One instance is already created for use and is named SdPlay.
Public class functions
init()
boolean init(uint8_t soundMode);
Call this to initialize the library and set sound mode. This function will also acquire the needed buffer (if not already set manually using setWorkBuffer), initialize SD card and sets up all used pins.
A combination of the following flags must be provided as argument (combine via or-ing):
Sample rate setting flags
- SSDA_MODE_FULLRATE - 62.500 kHz @ 16 MHz, 31.250 kHz @ 8 MHz
- SSDA_MODE_HALFRATE - 31.250 kHz @ 16 MHz, 15.625 kHz @ 8 MHz
Output channel configuration flags
- SSDA_MODE_MONO - Use only 1st PWM pin
- SSDA_MODE_STEREO - Use both PWM pins for stereo output or mono 16 bit
- SSDA_MODE_QUADRO - Uses four PWM pins for either 4 speakers or stereo 16 Bit
- SSDA_MODE_MONO_BRIDGE - Use both PWM pins for more power (mono output only)
Auto worker call flag
- SSDA_MODE_AUTOWORKER - Add this flag and you don't need to call worker for playback
The function return true if successful, false if an error occurred. You can use getLastError() to retrieve the error code. Typical reasons for errors are wrong SD card connection or too low RAM (1k heap required) for internal buffer available.
setFile()
boolean setFile(char *fileName);
After init was successfull, call this to select audio file by providing the filename in 8.3 format.
The function return true if successful, false if an error occured. You can use getLastError() to retrieve the error code. Typical reasons for errors are that the file was not found.
worker()
void worker(void);
Call this continually at least as long as the audio playback is running. This function fills the internal playback buffer by reading the next sectors from SD card. You can´t call this function too often, but a buffer underrun can occur when the time between two calls are too long.
As of Version 1.03: Add the flagSSDA_MODE_AUTOWORKER
to init and worker will be called automatically in background interrupt. You don't need to call it yourself anymore. This makes audio playback more robust when Serial functions are used. However, it does not work in conjunction with Ethernet-Shield, as access to SPI bus must be properly shared between SD-card and Ethernet chip.
play()
void play(void);
If audio is not playing, playing will be started. If it is already playing, it will start playing from zero again.
stop()
void stop(void);
Stops playback if playing, sets playposition to zero.
pause()
void pause(void);
Pauses playing if not playing, resumes playing if was paused.
setSDCSPin()
void setSDCSPin(uint8_t csPin);
Call this before init to set SD-Cards CS-Pin to other than default.
setWorkBuffer()
void setWorkBuffer(uint8_t *pBuf, uint16_t bufSize);
Call this if you want to use your own buffer (at least 1024 bytes, must be multiple of 512). Call this before init and then init will use this buffer instead using malloc to create its own.
deInit()
void deInit(void);
Call this to free resources like buffer, release SD card pins, audio interrupts and audio pins.
dir()
void dir(void (*callback)(char *));
Output the directory of the SD card. A pointer to a callback function must be provided. The callback function is called once for every file found in the root directory of the card. The strings contain zero-termination but no linefeeds.
Usage example:
...
// setup global callback function
void dir_callback(char *buf) {
 Serial.println(buf);
}
...

   // somewhere after initialization
   SdPlay.dir(&dir_callback);
isStopped(), isPlaying(), isPaused()
boolean isStopped(void);
boolean isPlaying(void);
boolean isPaused(void);
Returns the current state of the playback. The function isStopped() can be used after issuing play() to determine when the playback has finished.
isUnderrunOccured()
boolean isUnderrunOccured(void);
Returns if the internal underrun-flag is set and clears it. If audio sounds strange or has dropouts, test if underruns are the cause.
getLastError()
uint8_t getLastError(void);
Retrieve the last error code and clears it. To analyse the error reason, take a look also at the files sd_l1.h and sd_l2.h of the library to find the meaning of the code.
FAQ
It does not compile
- Are you using the latest version of Arduino IDE?
- SimpleSDAudio_V1.00 need at least V1.0.1 of Arduino IDE. It has been tested and works ok also under V1.6.1.
- SimpleSDAudio_V1.01 need at least V1.0 of Arduino IDE (remove complete block with !Serial from examples when using with Arduino IDE V1.0).
SdPlay.init fails
- Have you selected the correct CS pin for your SD-card? Uncomment the line
// SdPlay.setSDCSPin(10);
in the examples and enter correct pin number here. - Your SD shield may be crap and SD communication is only possible with limited speed. Try commenting the line
SPSR |= (1 << SPI2X);
in function SD_L0_SpiSetHighSpeed(). If this doesn't help, comment out also the first line and try again. If then init works you have a bad SD card shield.
How to use 16-Bit audio?
If you want to use 16-Bit audio, you need 2 PWM outputs joined together with a resistor (see above). Select SSDA_MODE_STEREO if you want one 16-Bit output channel, select SSDA_MODE_QUAD if you want two 16-Bit output channels (works only on Mega-Arduinos or with Timer2 patch).